
I have recently been looking in to some of the AWS free tier products. For those of you that don’t know AWS providers a number of their products free for 1 – 12 months from the date the account is created. In some cases the products are always free for basic use.
I was mostly interested in the the ability to host a WordPress site using an EC2 instance. There are a few options in the AWS market place that will work happily with the t2.micro free tier EC2. In my case I went for one offered by Bitnami.
For many Windows user connecting to a server via SSH is an unknown concept. Until Powershell version 6 Windows had very little support to be able to connect to a linux machine via SSH. In most cases putty was used for do this and it is still a very valid option. This article covers the basic steps of what you need to do to connect to your new EC2 instance from windows using putty.
Requirements:
PuTTy is installed
PuTTy Key generator is installed
Download link – Here
Instructions
Once your Ec2 is startup you are provided with a key .PEM file to be used to connect to the server. By default this file will not work with puTTy and it will need to be converted to a format that will work.
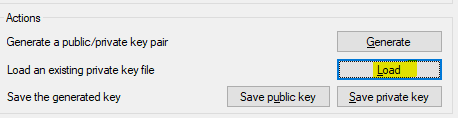
- Open PuTTy gen
- Click on the load button next to Load an existing a private key file.
3. Locate the PEM file and select it (note that you will have to change the file explorer drop down on the left to all files to view it)
4. Once loaded you have the option to set a passphrase. This should be done to ensure security.
5. Now click on “Save Private Key” and store is somewhere safe on your machine.
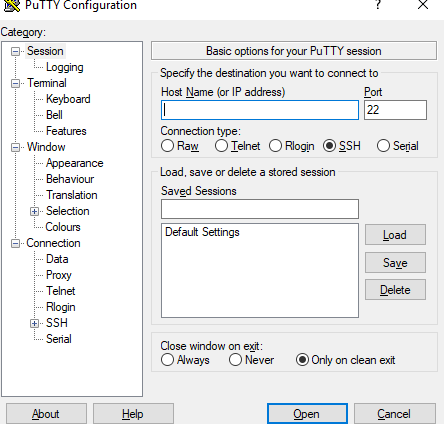
6. Open puTTy, you’ll automatically be sent to the configure window like this
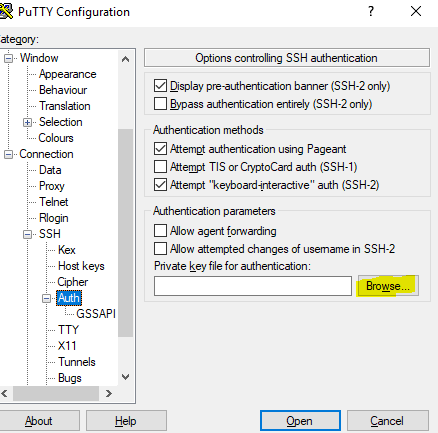
7. On the left side expand SSH and click on Auth.
8. click on browse and locate the newly exported key.
9. Scroll up on the left menu back to the top and click on Session
10. In the hostname field under the pubic IP of your EC2. If you don’t know what this is, it can be found in the AWS console under your EC2 running instances

11. Lastly click open in the PuTTy console and you’ll be promoted for for the passphrase you set earlier. Once entered you’ll be connected to your new linux EC2.