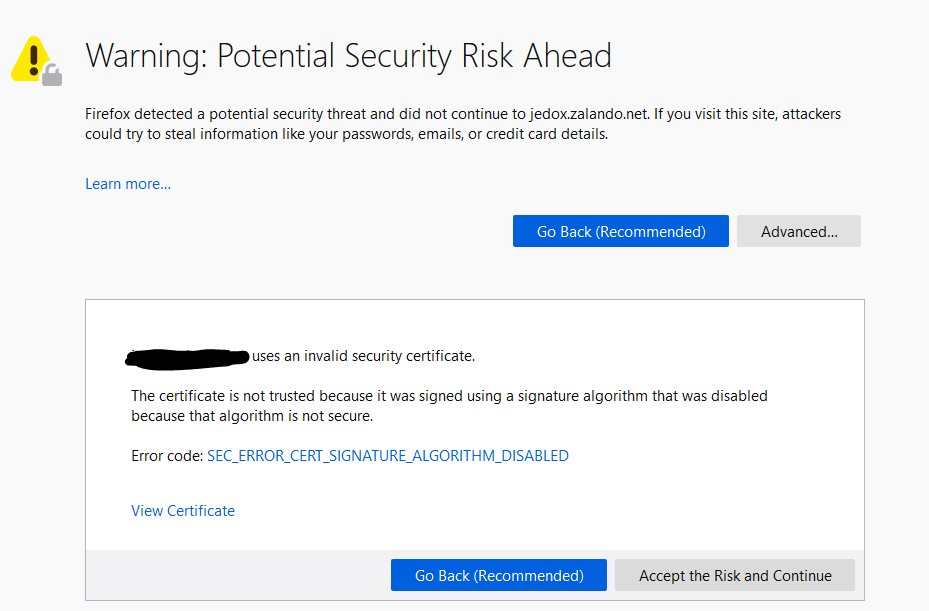
Recently after deploying a new PKI environment I found that some clients using certificates for https protocol transport layer encryption on their internally hosted sites were receiving Error code: SEC_ERROR_CERT_SIGNATURE_ALGORITHM_DISABLED in firefox.

Important note: Because Firefox only support public certificate Authorities be default please make sure you have set security.enterprise_roots.enabled to true on the about:config page in Firefox
After some research I found the problem is due to the AlternateSignatireAlgorithms = 1 parameter used in the setup of the root CA. The good news is it is possible to change this without recreating the whole environment. In this example I’m using an offline RootCA with a two tier PKI infrastructure, the issuing CA is running on Windows Server Core.
Step 1. Check the root certificate of the root CA and issuing CA using the properties of the Certification Authority console. If the problem exists you should see the Signature algorithm field showing the value of RSASSA-PSS

Using command prompt use this command to check if this value is set on the server:
certutil -getreg ca\CSP\AlternateSignatureAlgorithm
The result should be this if enabled

At this point we know the value is enabled. Us the command on both the RootCA and issuing CAs and note which ones have this enabled.
Step 2. On all the CAs with this value enabled (1) run the following command to disable it.
certutil -setreg ca\CSP\AlternateSignatureAlgorithm 0
Also check the CAPolicy.inf file under C:\Windows if you used it for the installation. If it contains a line for AlternateSignatureAlgorithm make sure it’s set to AlternateSignatureAlgorithm=0
Apply this on all CAs that had this enabled and run the command
net stop certsvc && net start certsvc
or reboot
Step 3. Now we have to renew all the certificates on the RootCA and the issuing CA. This is relatively straight forward.
Log on to the root CA machine. Open the Certification Authority console. Make a right-mouse click on the CA name, select All Tasks and Renew CA Certificate. Click Yes on the question to stop certificate services. On the next screen answer the question Do you want to generate a new public and private key pair? with No and click ok. Export the new .cer file and Add the new root certificate to the clients Trusted Root Authorities GPO and give it time to propagate to all the clients.
If you are running an issuing CA with a GUI you can repeat the renewal steps of the above instructions. In my case we are using Windows Server Core so the following steps are needed.
Logon to the Root CA and set the period of renewal validation by running the following commands
certutil -setreg ca\ValidityPeriod Years
certutil -setreg ca\ValidityPeriodUnits 10
certutil -setreg ca\RenewalValidityPeriod Years
certutil -setreg ca\RenewalValidityPeriodUnits 10
net stop certsvc & net start certsvc
Now logon to the issuing CA and run the following
certutil -renewCert ReuseKeys
Note: If the Renewal validity period is set wrong the new certificate will renewal for the issuing CA will match this value.
You can verify the settings by substituting “-setreg” for “-getreg”
Once you run the renewcert command you’ll be prompted use an only CA or Cancel
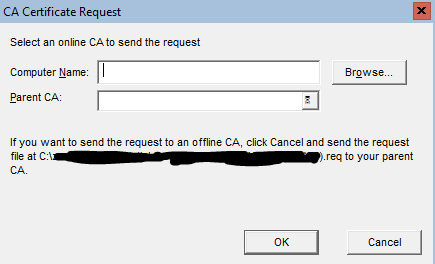
As I’m using an offline CA I will need to click cancel and the request file for this renew will be now located on the C drive of this server. This is specified in the part of the Request message I’ve blanked out.
Log on to the RootCA and either copy the .req file to the RootCA or navigate there via the UNC path. From the Certification Authority console on the RootCA right click on the server icon and select “Submit new request” under the All Tasks menu. location the req. and open it.
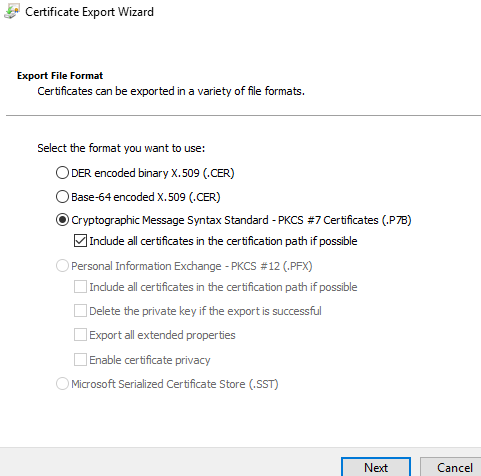
The request will automatically be in Pending Requests. Right click on it and click issue. Open the new certificate from Issued Certificates and click Copy to File under the Details tab. Export is back to the issuing CA server C:\ with the following export format.
Switching back to the issuing CA console run the command
Certutil -installcert
# Locate the new certificate and open it
net stop certsvc & net start certsvc
This would be all you need to do. Just repeat the issuing CA process on all the issuing CAs that received there certificate from this Root CA.
To double check the signature algorithm is correct. View the Certificate unter the properties of the Certification Authority console like in step 1. You should now see the following.

Important: It is not recommended to remove the old certificate this will cause damage to your PKI environment
